Posts

Showing posts from 2016

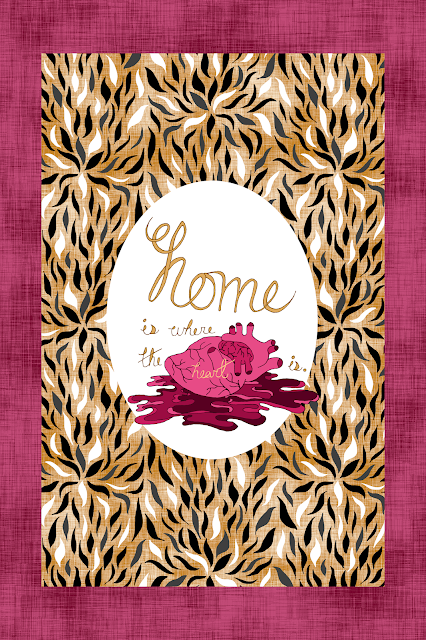
Contest Entry: Spoonflower Print

Image
2017 Spoonflower T-Shirt Voting begins November 17 What does Spoonflower mean to you? What kinds of things come to mind when you think about the brand? Is it sewing? Design? Community? Flowers? Spoons? Put it all down into a unique, never before seen surface pattern for a t-shirt that Spoonflower will be printing for 2017! Entries will be previewed on an 21" x 18" fat quarter size and should repeat. Spoonflower Print

Contest Entry: "Home is Where the Heart is." Tea Towel

Image
Home is Where the Heart Is What are the most important aspects of home life to you? What means the most to your loved ones? Keep it quirky or make it traditional–just be authentic! The lovely thing about tea towels is how they add a splash of personality to any kitchen. Deadline to enter is October 11th, 2016. Please note that designs can be all-over prints, or formatted as a recipe for a tea towel — the choice is yours! Prizes: Grand prize winner will receive a Maran Slipper Chair from Roostery, upholstered in Eco Canvas fabric in a design of the winner’s choice. Top 2 – 10 will receive one Orpington tea towel from Roostery printed in their winning design. Top 25 popularly voted winners will have their designs made for sale automatically, provided they are verified sellers. "Home is Where the Heart is." Tea Towel "Home is Where the Heart is." Tea Towel You can see my entry above. It's a fun mix of pinks and golds focusing on a very literal imagini

Contest Entry: Pumpkin Pie Tea Towel

Image
Grandma’s Kitchen In the South, there’s such a tradition of passing down prized family recipes, and tea towels are a beautiful way to preserve this aspect of family heritage. This week’s design challenge is your chance to transform your treasured handwritten recipes into tea towels, and these crafty creations are perfect for everyday use and as gifts to family around the holidays. Deadline to enter is October 4th, 2016. Pumpkin Pie Towel This is my entry into the contest. This pie is my childhood favorite and I'm usually the one volunteering to make it for every major holiday. It's basically our family's official spin on the classic Libby's recipe: lots of fresh pumpkin, heavy on the spices, and featuring a toasted marshmallow topping. I was in my twenties before I realized that most people don't do the marshmallow bit!

Waistcoat Project

Image
This is the first in a series of posts about my latest project, a fancy steampunk inspired coat. The pattern is loosely based on a Simplicity pattern, 2172, that I have been slowly altering as I go along. Here are a few sketches to show the basic idea for the coat. The Simplicity pattern I'm using; all the new pattern pieces made moving everything to an empty tin box necessary. This is my first sketch when I had simple dreams of adding a hood and maybe changing the neckline. This is a much later sketch showing how I've chopped off the patterned skirt in favor of a pleated and much more dramatic one. This also shows the fancier detachable sleeve option. I honestly don't know how many sleeves I will make. The plan at first was to do the pattern with a few small touches thrown in to make it my own. Adding a removable hood and changing the neckline slightly were quickly followed with making detachable sleeves, and adding a high collar in the back. The pockets b

Project Photos: DIY Cat Bed Tutorial

Image
Azazel Today I'm going to show you how to sew a fabulous, reversible cat bed with 2 fat quarters and some fluffy poly-fil. You can really use any kind of stuffing that you like, this was just the biggest bag of fluff that my Walmart carries. (it doesn't take anywhere near that amount of filling, I plan on using it for many more projects) Bird Floral Dark Blue I used one fat quarter of Spoonflower's fleece and cut a rectangle of white faux fur from Joanne's to match. On the fleece, mark on all four corners a 4 inch x 4 inch square. I used a water soluble marker. Pin the corner so the edges of the square line up with right sides together,  and sew a seam along or just inside that line. Repeat for all four corners.  I went over it twice with the zigzag setting of my sewing machine. Then trim down the seam allowance and get rid of any marks that might bleed through to the other side. You should end up with a floppy shallow box